Categories
Ultimate Guide

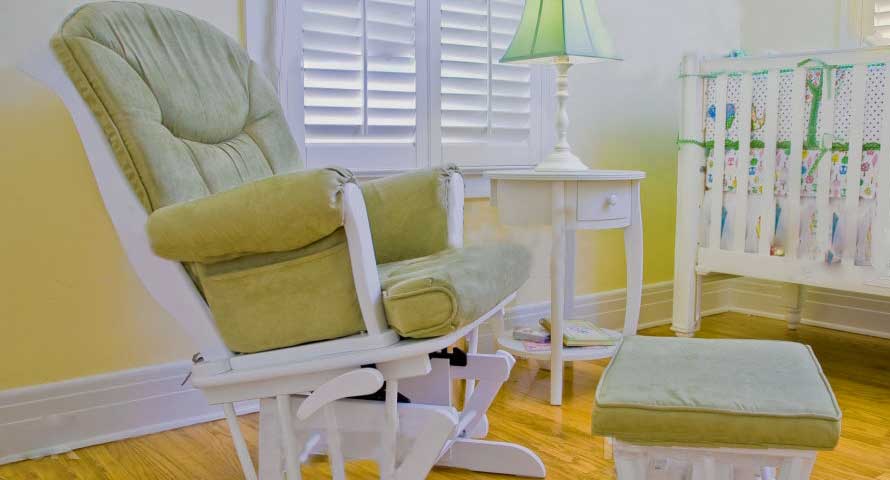
How to Recover a Glider Rocker without Sewing ?

It is comparatively easy to buy a glider rocker. Normally they are sold in furniture shops, online sites retail stores, or second-hand shops. But when you want to match with nursery room; it is a little tricky to match from default factory upholstery.

On the other hand, if you buy a second-hand glider rocker or it’s one of the Best Nursing Chairs, naturally your mind may thirst for a unique look of the product.

That is the reason, you should learn to reupholster a glider rocker cushion on your own, And even if you have no sewing experience you can do to recover a glider rocker.

So, learn how to recover a glider rocker without sewing experience-

Process 1: Using Velcro Brand Fabric Fusion Tape

What items will require:

[su_list icon=”icon: hand-o-right” icon_color=”#567ac3″ ]

  • A glider rocker that will be recovered
  • Fabrics that recover the glider cushion. And Buy your enough favorite color upholstery fabric
  • Velcro Brand Fabric Fusion Tape ; the alternate way of  sewing process
  • Hot Glue as a substitute for needle and thread (sewing)
  • Scissor
  • Seam ripper

[/su_list]

How do, Step by Step Process:

[su_list icon=”icon: hand-o-right” icon_color=”#567ac3″ ]

  • Firstly uncover the chair and see the glider’s structure; if it is ok for use
  • Then remove the current fabric of the cushion. In this case, use a seam ripper to rip out buttons and do it carefully as if the cushion remains good. You may need scissors to do it perfectly.
  • Now place new upholstery fabric on a flat space and trace around the cushion using chock. Make sure you have sufficient fabric to wrap the cushion and for adding fold.
  • Now cut the marking part. And wrap it like a gift box to confirm it looks good and smooth. Also, be sure the joint will be placed on the bottom or back part.
  • In this portion fold the edge of the fabric and make it stable using glue. Now pill the Velcro fabric tape and stick on the seam of fabric. And put the opposite part in the same way.
  • Now ready to use in the chair
[/su_list]

Process 2: Make Upholster Using Removable Zip-off Cover

What items will require:

[su_list icon=”icon: hand-o-right” icon_color=”#567ac3″ ]

  • Hot glue gun
  • Glue
  • Hem tap
  • Canvas cloth/medium to heavy-weight fabric
  • Muslin fabric
  • Iron
  • Zipper

[/su_list]

How do, Step by Step Process:

[su_list icon=”icon: hand-o-right” icon_color=”#567ac3″]

  • You have another option without Velcro tap. That can be done by removable zip off cover.
  • Firstly hem each edge of muslin fabric and the upper Canvas cloth using hem tap. Just put the hem tape on the edge of fabric. Fold it and iron on there, press down, and hold about 90 seconds. If they not joint strongly take more few seconds.
  • In this step, attached one part of the zipper with muslin fabric. The glue should be used on the fabric part of the zipper and also make sure no glue spread out on the cloth and no glue stick over the zipper opening-closing part. Thus you may be in trouble to fulfill the aim of zipper.
  • Once it is complete join another part of the zipper with canvas fabric following the same process.
  • Now you are on the way to the goal. Just close the other 3 parts of the two fabric using glue. And make sure there is no opening part that exists in the three parts.

[/su_list]

However, In this case, attaching gripper may seem a little tricky. But visual guide makes it easy to capture. This video may help to assemble the cushion with zipper :

[su_list icon=”icon: hand-o-right” icon_color=”#567ac3″]

  • When it is ready you will be able to hold in cushion, just open the zipper, stuff cushion and close cover using zipper off.
  • Finish the task. Now put in the cousin and enjoy with recovered glider rocker

[/su_list]

This option is very useful as after a few days’ usages it becomes very messy and needs to clean a regular basis. Just open the zipper; pull out from the cushion and wash to ensure hygiene in the nursery room.

Finally, this is a very easy DIY project to replace the upholstery of a glider rocker; no need to have sewing experience. But definitely the sewing process makes it more durable. However, you finally recreate the glider matching look with the theme of the nursery room. And really return a very good feeling when you have done yourself at home.

Categories
Ultimate Guide

How to Hang a Swing on Branch Less Tree? – 2 Easy Ways

Children love swings! But then again, who doesn’t, right? Kids or adults, everyone likes the idea of spending the late afternoon hours in the backyard, swinging away, catching the breeze in their hair! However, the most significant problem people have when installing an outdoor baby swing is that they don’t have a tree with sturdy branches. If you’re going through the same issue, worry not! Here’s how you can install a tree swing no horizontal branch needed!

Best 2 Ways to Hang a Swing without Horizontal Tree Branches

Essentially, there are two ways to install a tree swing without the availability of branches. One of the methods requires a single tree, while the other requires two. Depending on your convenience and availability of trees in your backyard, you can choose either one.

1. Hang a Swing Using One Tree (tree swing no horizontal branch)

Suppose that you only have one tree available, and that too doesn’t have the healthy, large branches you need to install a swing. In another case, you might have several trees, but none of them are aligned together to give you the ideal spacing. In either scenario, here’s what you can do:

Picking a Tree –

Select the sturdiest tree that you can find. Even if it doesn’t have the branches, it needs to be strong and resilient enough to carry your child’s weight. If you want help with the selection, pick a relatively older tree since older ones can sustain more weight. Their roots are fully developed and fixed, and their bodies are sturdy.

A younger tree might look healthy, but there’s no way to make sure it’s fully developed yet. Thus, “play” on the safer side and pick the older one. Decade-old oak trees are the preferable choices.

This video may help more as visualize the idea :

Making an Artificial Branch –

Here’s the magic part! If your tree doesn’t have a horizontal branch, you can make one! Pick a suitable material for this purpose; make sure it is strong and resistant. Popular and preferable options include metal boards or strong wooden boards.

Apart from the strength and resistance of the material, make sure it is adaptable as well. Since you are going to nail or drill it into the tree, it should take the necessary shape and adapt to the position.

Last but not least, pay special attention to the length of the board as well. The branch should be a minimum of 1.5 meters in length. The thickness, however, depends on the weight you are going to put on it.

Attaching an Artificial Branch –

Once the artificial branch is complete and you’re entirely satisfied with the way it looks and feels, it’s time to attach it to the tree. This part is relatively more comfortable and doesn’t take more than a few minutes. Take a drill, some bolts or nails, and take a good look at the chosen tree.

Observe and find the right spot to attach the branch. This particular spot should be somewhere low, where other branches separate from the tree’s trunk. Place your DIY branch on the trunk and nail it down, making sure it’s fixed in place.

Once this part is complete, notice how much of the branch is hanging outside. This length shouldn’t be more than one or two meters, and the unit should be perfectly parallel to the ground. If your artificial limb ends up being too long, it could compromise the stability and lead to possible hazards later.

tree swing no horizontal branch

Hanging the Swing –

You are almost there! If you have a swing already, good! If not, you can purchase an entire kit that features ropes, chains, hooks, and a swing board. You can even make your swing at home if you want. There are several different types of DIYs on the internet, and you’ll have loads of fun doing this activity with your child. Plus, you’ll be saving quite a lot of bucks!

Once you get your hands on the swing, hang it from the artificial branch, and test it out! Let your child sit on the swing for a few minutes while you supervise. Check the branch and make sure it’s not moving. Ensure that it’s stable, and the swing isn’t making any uncomfortable movements.

2. Hang a Swing Using Two Trees (tree swing no horizontal branch)

If you’re lucky enough to find two consecutive trees aligned correctly, it’s an opportunity- take it! The process is pretty much the same: making sure that the trees are sturdy and robust, creating a fake branch, and attaching it to the trees. However, there are a few additional steps and benefits to this method.

Once you have the board ready, attach it to both the trees. It’s way more stable than installing a swing on one tree and ensures more safety. Nail the board on both the tree trunks, but make sure the distance is no more than 5 meters. Excessively long lengths and distances can compromise the safety and stability you were going for in the first place. Now, attach the swing as you did in the first method and test it out under supervision for a few minutes.

Some Extra Steps to Ensure Better Safety –

[su_list icon=”icon: hand-o-right” icon_color=”#567ac3″]

    • Don’t let your child sit on a swing unsupervised if they are younger than four years.
    • Make sure the rope is high-quality and doesn’t have any flaws or weak spots. Also, change the rope every couple of years.
    • Double-check the knots, nails, and joints, if any, and make sure everything is secure.
    • Before finishing and finalizing, have your kid try it out. This way, you can make sure the height is appropriate for your child. Swings that are too high or too low can be unstable and uncomfortable.

[/su_list]

In Conclusion –

So that’s how you install a tree swing; no horizontal branch needed! Pretty simple and easy, no? Hence, if you don’t think you have the ideal space for a swing in your backyard, look again. But this time, look with a keen eye and see how creative you can be with a little bit of motivation and an artificial branch!

Categories
Products Review

Review of PYD Mesh Bed Guard Rail for Toddlers

The transition from bassinet to crib and after that crib to bed, both is stressful enough. But when you are on the way from crib to bed transition a bed rail will eliminate a lot of fairness about falling.

If you’ve been blessed with a toddler who’s showing early athletic prowess, this sturdy and large bed guard will ensure his safety and make you feel happy. On the other hand, A sound sleep without worrying about a kid is more expensive, which can ensure the best toddler bed guards. Readout details review of ComfyBumpy mesh bed guard rail.

PYD mesh bed guard rail gate

Product details:

Dimensions of Each Rail: 59″/71″/79″ L x 27″H

Care Instructions: Hand Washable

Target Gender: Suitable for both boys and girls

Item Weight:‎ 7.93 pounds

Size: The Bed Guard Rail featured safety side support that covers from the kid’s bed to the entire length of a full-sized bed. Configure one and you have a pretty safe way of keeping your toddler where they belong as they co-sleep with you.

Vertical Lifting: By surrounding the baby bed with this foldable bed rail will ensure the baby’s safe sleep and avoid the accidental issue. The height of the base is adjustable from 0 to 6.7 inches thus it initializes a preeminent option with verities of bed.

Washable and Breathable: What I really like about this bed guard is the cover is in mesh fabric and thus can be washable on laundry day. The bed rail permits to follow kid’s activities because of its netting fabric and breathable functionality. On the other hand, its durable constriction allows kids to safe, and no possible way to fall out.

PROS:

  • The longest bed rail fits toddler beds, solid wood beds, built-in beds, flatbeds, thick mattresses beds, and other large-size beds
  • Impossible to fall out
  • Hand Washable
  • Adjustable height

CONS:

  • A bulky toddler bed rail
  • It seems a little expensive for some parents. However, the baby’s safety is the top priority that can ensure this bed guard.

Finally, It is always better to choose the bed guard rail which can ensure durability to keep safe, washable to avoid hypoallergic material, and Breathable–mesh fabric to see kid’s activities. Children have a low level of immunity, thats is why you need to make sure your child has the right bed rail, which is safe for them.

Categories
Baby Gift Gifts

10 Absolutely Adorable Mom and Baby Costumes for Halloween

Is this year your child’s first Halloween? Do you want to celebrate Halloween with the little baby? Then select some matching mother and baby costumes that will make the moment more enjoyable and create a lot of funs. And when the baby grew up and memorizes the time surely she will be thankful to you and feel like she were a significant person to you with other family members. Here are some adorable, creative, funny, and easy to put together matching mom and baby Halloween costumes ideas. Just read and consider which is the best compliment for you.

Mom and Baby Costumes:

1

Are you adventure loving guy and now ready for Halloween with your newborn? So, Take this theme underwater with the diver and octopus baby costume. It features a blue octopus baby carrier with a diver’s mask, flippers, and a cute headpiece for baby.

2

Just visualize the little baby shark swimming through the sea for Trick-or-treating and is it not really a scary environment! Yes, now think about the cool and supper comfortable red lifeguard shirt for you, who is dedicated to the little shirk. How cute the mom and baby costumes for this Halloween! Take yours and enjoy it!

3

Mother-baby relationship is the world’s best bonding. On a special occasion (that could be Halloween ) matching items like Mummy Unicorn and Baby Unicorn make them look more allied. Mother costume includes a thin white plush dress with an attached tutu dress in pastel colors, faux fur trimmed hood with horn, ears, and pom poms, and faux furry boot covers.
And the baby item has a special side, which is a jumpsuit with 1 pair of booties.

4

Have you ever consider about Rainbow Brite costume for Halloween? I am sure many moms will love to pick this item among the other duo for mom and baby costumes.
Why did they choose it? Okay, the name of the item reflects its properties. Colorful, gorgeous looking, and also adorable costume. For your little one here is the infant Rainbow Brite Sprite Costume.

5

When a mother wants to make a different feel with her baby as she taming the little beast, then this adorable match-up costume (lion tamer as mom and baby as the baby lion cub) is the perfect pair. Also, the busy mom who wants to feel like that just picks the costume that includes wig, the necktie, and whip.

6

Since little baby nabbed Mama’s heart, this police officer and playpen jailbird costume perfect pair to them. Mama can put on this police shirt with matching leggings and fulfill all with some accessories like this police hat and with a classic aviator sunglasses, where the baby has the nice combination jailbird costume with his mom.

7

“Little bo peep has lost her sheep…” The duo inspired by the popular nursery rhyme. For your adorable little sheep, the bo-peep is the perfect complement. Mama will act as boo peep to care for the teeny sheep.

8

This is the accurate duo for Game of Thrones fans where Mom acts as Daenerys Targaryen or whatever you say as Mother of Dragons, Khaleesi, Lady of Dragonstone, Protector of the Seven Kingdoms, The Unburnt, etc. On the other hand baby as Rhaegal you are sure to set the Halloween festivities aflame. This is not only the best but definitely you will look cool among the best. And an appreciative wig will complete the mom’s Daenerys costume.

9

If you have a fascination with bunnies and also looking for soft & comfortable costume then why not pick the fuzzy bunny mom costume for Halloween? Naturally younger baby likes who try to swaddle them without break free over the night. And for the bunny mom, carrot baby costume is a seamless matching.

10

Monkey – Tree has great connectivity to them. Maybe your brain is now working about their fun. Form the idea why not mom be a tree and baby stay the little monkey costume. If you love this theme just visit here for an infants monkey costume. Also, see more nature-inspired Halloween outfit here

Categories
Kids

Learn How to Make Slime with Detergent

The easy DIY process to construct slime with laundry detergent and the totally nontoxic recipe for kids, that means without Boric Acid, make slime with laundry detergent recipe.

Note: Boric Acid is an activator for making slime.

At present play with slime (It is icky, sticky, and gross) among kids is very familiar and trending, also becoming increasingly accepted with adults. By contributing slime making for kids, Parents also pass a good time with it as those provide a kind of sensory play, help to enhance creativity, and engage children for attention.

Now,

Skills Required: None. 

All age groups from toddlers to adults will be able to make it, but the first time may not hundred percent okay. Don’t’ be worried about it, it is really a very simple recipe. We need just a few ingredients.

You may recall why we didn’t enjoy with it like at present though all ingredients are in-home or close our hand. That was a simpler period, we did not come from such environments or our family scolded us to play with Tupperware containers or other outdoor play, right?

Cannot wait for the recipe :

How to make slime with detergent?

Ingredients Need to Make Slime:

There only need three Ingredients:

1. Laundry detergent

2. Water,

3.Glue (any kind of glue without super glue)

However, you can decorate or make an engaging look with many funny components. When I make Slime for my two children they are excited to add extras that return them more fun. I would like to explain the items in detail quickly; you can toss and see the final result.

What Laundry Detergent is Best for Slime?

It’s a DIY project. So, To make slime using laundry detergents you should try different types to get the best consistency. Sometimes may laundry detergent is okay but for any kind of glue (without superglue), it may not give you the perfect result. However, I tried with Tide and get a fantastic result. You can try using Tide, or Gain or Cheer.

Laundry Detergent Slime Recipe:

Tools and Materials:

1.Glue

2.Water

3.Laundry detergent ( Activator)

 and

4. Mixing bowl, Measuring cup,Fork, airtight container etc

Instructions: How to Make Slime with Detergent

1. Mix together equal amount of glue (without super glue) and water in a bowl. I used 1 cup of each as I will store and use next time.

2. Continuously stir the mixture with a fork until combined.

3. At the time mix some food color or glitter if you desired. Again mix thoroughly.

4. Now, add 1/2 cup of liquid laundry detergent. Begin mixing with a fork. And continue the mixing process until they get sticky and be a consistent look.

5. When slime forms, start kneading with hands and add any addins at this time.

6. Finally, store the slime in an airtight container when not being used. (because in open air slime will loos it’s behavior easily )

how to make slime with detergent

Tip 1: Here I mentioned 1-2 cup of laundry detergent as Activator. You should add them a little and stair, combine it, and again add a little. Repeat it until you complete the full process.

Tip 2: Use a bowl that only dedicated to crafting, though the ingredients are non-toxic and safe for food. And also using a designated bowl can reflect kid’s happy feelings.

What Add ins Can You Put in Slime Recipe?

Normally I use food color and sometime add glitter. But here are more options to use that  make funnier environment:

1. Food Coloring: For the base color you can use food color in the Slime

2. Action Figures: On a special occasion like for Halloween slime! You can use it.

3. Beads: Different types of plastic pony beads really create more fun

4. Buttons: When the slime is colorless the different colors and shapes of a small button make another look of slime.

5. 3D Polymer Slices: The fun creator are small polymer pieces and especially fruits are really adorable.

6. Essential Oils: It makes you really a good feeling for slime. the fragrance is really good.

7. Fake Snow: It’s the great items when makes slime on Christmas occasion.

8. Foam Beads: It is almost available near your house shop and colorful foam bead are really amazing pieces.

9. Glitter: For a very cool effect, this is the best tenants of Slime. You can only use it rather than others.

10. Polymer Clay: You can also use Polymer Clay for the slime recipe as it makes Slime softer.

11. Pigment Powder: Another way to add a base color is Pigment powder, they are Non-toxic elements for your kids.

12. Pom Poms: A lot of color and consistency can get from the little balls.

Have you enjoyed kids’ crafts and ready to prepare yourself  now? Let’s try and have many many fun with the little ones.

Categories
Moms Zone

11 Baby Shower Table Centerpieces that are Popular & Trending 2022

When you think about the unique plus homemade baby shower decorations for tables, that would not always perfect as desire. Because, when think for items particularly for baby boy or girl then the total context of baby shower will be different. So, all in one may not in front of you which you want.

Here we deeply filtered out some items with homemade also. So, Overview of the unique, trending and demanding items. I hope you will not be disappointed and prefer most of the items.

[table id=12 /]

Some Homemade Baby Shower Centerpiece Ideas:


1

Water Gel Beads for Super Creative Baby Shower Centerpieces


2

Handmade Baby Girl Shower Cake Topper Decoration


3

24 pcs Woodland Animals Creatures Cupcake Wrappers


Baby Shower Centerpieces For Boys :


4

Little Man Cake Topper Mustache Hat Bow Tie


5

48 Cupcake Toppers – It’s a Boy Kids


Baby Shower Centerpieces For Girls :


6

2Minnie Mouse Theme Party Balloons


7

Baby Girl Angel Wings Designed Chocolate Box


8

Pink And Gold Party Supplies Tutu Cake Topper


Unique Baby Shower Centerpieces:


9

21 Zoo Animals Cutouts for Baby Shower


10

Paper Building Blocks Baby Shower Centerpiece

11

6ft Tulle Table Skirt for Rectangle or Round Tables

Categories
Baby Swing Products Review

4moms Mamaroo Vs Rockaroo, 👶Which is Best for Little Baby ?

The idea for this article came to me because of some of the confusion that has surfaced while talking about two of my favorite baby rockers – Mamaroo and Rockaroo. With all the good Mamaroo vs Rockaroo reviews, choosing between two favorites can easily get very daunting, right? After all, how do you decide when both of them look a lot like each other?

Well, there’s good news for you…

In this article, we’re going to decide which one you need for your baby when it comes down to choosing between the 4moms Rockaroo vs Mamaroo. Plus, as it turns out that there are few minor details between the two Swings that make the actual differences. And if you know what you are looking for and what features you need in the rocker, it’ll help you to take an easy and effective decision.

So, which is the better of the two?

What features do you need anyway?

Let’s take a look at both reviews and then we can decide afterwards.

4moms Rockaroo Review :

This electric baby swing offers a cool mesh fabric that supports breathability and airflow to keep the baby cool and comfortable. Most importantly, remember that it is not a sleeper as it doesn’t have a flat surface for sleeping which is recommended by pediatricians.

Rockaroo swings are simple and compact. One Rockaroo weighs only about 18 pounds and takes up 70% less space than a traditional swing. It has only one motion – front to back and its opposite just like in a rocking chair. The design is aesthetic and suits well in all kinds of rooms. It’s barely noticeable enough owing to its 16.5 x 29.6 x 27.5 inches dimension.

Features –

Synced Music and Movement –

One of the few things that keeps a little one happy and engaged is music. But what if the music is synced with a front to back movement?

Yes, that’s right. You can play music because it’s Bluetooth enabled and the motion perfectly replicates the swinging motion of a mother’s arm so that the baby can stay cheerful and soothing at the same time.

4moms rockaroo swing

Mobility and Capacity –

It’s rare to get everything with one swing seat because, usually you have to make separate purchases like the little hanging toys. But, that’s just one side of the story…

Rockaroo baby rockers give you everything with a single purchase including attractive hanging toys. Also, the carrier is ideal for babies weighing between 6 to 25 pounds.

Electrics and Design –

4moms Rockaroo operates on electricity since it does not carry a battery. So, you don’t need to worry as long as there is power and the little angel is asleep. What’s more interesting is the other specs…

Each Rockaroo has a dimension of 16.5 x 29.6 x 27.5 inches and weighs roughly 16 pounds. You see, the compact design makes it easy to fit into any room. The control panel can regulate at five different rocking speeds. On top of everything, the seat fabric is machine washable.

Age and Weight Limits –

By now, you should know that Rockaroo has a compact design. So, it’s easy to assume that it supports children between 6 – 25 pounds. Actually, it’s only usable as long as the child cannot sit up by itself. And you shouldn’t risk it afterward.

Pros:

[su_list icon=”icon: check” icon_color=”#6EA533″ indent=”20″]

  • Small in size
  • Seat height is at a moderate level
  • Super simple installation
  • Shape of the seat cradles the baby’s head nicely
  • Babies absolutely love it

[/su_list]

Cons:

[su_list icon=”icon: check” icon_color=”#FA5738″ indent=”20″]

  • Makes a loud clicking noise at higher speed
  • Should have included an infant insert with the price

[/su_list]

I’d be inclined to check this one out if I were you. In my opinion, this seems more bang for bucks. So, check it out by clicking right here.


Overview of 4moms mamaroo vs rockaroo

[table id=10 /]

4moms Mamaroo Review :

The Mamaroo is bliss for children that loves to swing. And let’s face it…

Little ones love to swing. Just take a look at their face while they’re in it. See how happy they look. The best thing about a Mamaroo in a flash is…

It moves just like you do. The swing is designed to replicate exactly the kinds of motion the parents can do with their arms. This gets the baby in a comfortable enough position to feel safe, secure, and comforted.

Wait, there’s more…

This electric swing is Bluetooth enabled and so, you can easily change the swinging motion or the speed. You can even put on some soft music to keep your child happy and active. You can do all these without even disturbing the baby.

The Mamaroo is every mum’s favorite. But, here a warning…

Mamaroo is not a sleeper. It’s just an infant seater that’s meant to comfort your child and put it to rest. Since it has a slightly reclined surface, it is not recommended for sleeping for more than 3-4 hours. And this advice strictly comes from the pediatricians.

Features

Since it’s that good, let’s take a look at some of its best features:

Ease of Use –

Mamaroo enabled its users to change the dynamics of the swing from a mobile app. In my opinion, this has got to be one of its best features. You can regulate the speed, motion, and also switch it on or off without even getting near the machine.

Once you log in, the settings can be changed anytime without disturbing the baby. The app is android and iOS-enabled. However, it is compatible with iOS devices after the iPhone 4S.

Bluetooth Enabled –

If you think the app is the only good thing in this swing, then you haven’t seen it all just yet. Bluetooth allows you to play soothing music to keep the child busy.

Besides, the Bluetooth lets you sync with the swing settings if you find it hard to use the app.

MP3 Plugin for Playing Music –

Music is one of those things that can stop a child from crying and can even put it to sleep. If you know your child prefers music, then you’re in for luck. The Mamaroo has four built-in music.

But, if that’s not enough for you, then you can always plugin with your phone with the MP3 plugin. Plugin and play any music you want to.

Flexible Seat Design –

This rocker is unlike all other rockers in the market that has a default seating position. It actually offers four different seating positions instead of one. Just adjust it according to your baby’s need.

Whether your baby needs to sleep or play, it doesn’t matter! Just press a button from the app or the swing control panel to adjust the seat accordingly.

Pros:

[su_list icon=”icon: check” icon_color=”#6EA533″ indent=”20″]

  • Varying motion for more comfort
  • Better Bluetooth control range
  • Simple installation
  • Adjustable seating position
  • Compact design and lightweight
  • Kids love the toys on the mobile
  • Infant insert holds the baby nicely
  • Speakers are not of top-notch quality but good enough for babies
  • Fabric is soft, durable, and easily washable
  • Kids just love it!
  • [/su_list]

    Cons:

    [su_list icon=”icon: check” icon_color=”#FA5738″ indent=”20″]

    • Clicking sound gets louder at higher swing rate
    • The mobile arm is very slim and looks breakable
    • Relatively short power chord
    • Movement is not smooth at all times

    [/su_list]

    Now, I would suggest you stop reading this immediately and buy it if you can afford to. If you can’t do that, just mortgage your house, sell your car, or do something. It’s worth the peace when your child sleeps in it.

    Mamaroo Vs Rockaroo – Similarities –

    These are some of the similarities in both of these products:

    [su_list icon=”icon: hand-o-right” icon_color=”#567ac3″ indent=”20″]

    • Weights up to 25 pounds
    • Compact design
    • 5-speed settings
    • MP3 plugin port for extra music
    • Runs on direct electricity
    • Swing seat is easy to unzip and machine washable
    • Mobile holds the hanging toys
    • Automated swing motion
    • Product doesn’t come with a newborn insert
    • Sturdy build and endurable

    [/su_list]

    Difference Between Mamaroo and Rockaroo –

    As much as you’d like to think that both products are identical, here are some features that set them apart.

    Price Comparison

    By price comparison, Mamaroo is the clear winner and also the expensive one. However, if you think Mamaroo is the only bang for the buck, then think again. Rockaroo may be less expensive but it offers almost all the features you’ll find in a Mamaroo rocker.

    Motion

    The Rockaroo has only one kind of motion setting i.e. forth and back. But, the Mamaroo on the other hand has five different motion settings that mimic the motion of the arm movement of the baby’s parents.

    I would definitely give a plus one to Mamaroo for the added varying motion.

    Default Sound

    By default, the Rockaroo has no given music with the rocker. But, the Mamaroo has 4 selective music specially curated for your little one’s delight.

    Seat Design

    The swing seat on a Rockaroo rocker cannot be adjusted to the baby’s comfort. But when you have a Mamaroo rocker, this isn’t a problem at all. This is a huge deciding factor because it comes down to the baby’s comfort.

    Bluetooth Enabled Rocker

    Bluetooth connection is a special feature in both Mamaroo and the Rockaroo. The Mamaroo rocker can control the speed, motion, music sound, and power on/off remotely. It allows you to execute all the functions in the app via Bluetooth connectivity.

    But, the Rockaroo on the other hand doesn’t allow you to accomplish all these functions via Bluetooth.

    Who’s The Clear Winner?

    That’s as much as I can give you about Mamaroo vs Rockaroo rockers. I think all the info will do great justice in picking the right one.

    After comparing all the 4moms Mamaroo vs 4moms Rockaroo reviews, it is my understanding that the 4moms Mamaroo is a clear all-rounding winner.

    So, if you ask me which is better Mamaroo vs Rockaroo?

    I’d be inclined to 4moms Mamaroo over 4moms Rockaroo.

    But, if you are looking for a lower budget alternative but cannot set your mind on anything else, then I’d suggest you take the Rockaroo.

    Before you think you can completely rely on my decision-making, just know that I’ve read almost every Mamaroo vs Rockaroo review on Amazon. And I think I know which is a good deal for money when it comes to deciding for you.

    So, rather than trying to manage an unrest child, just spend some bucks on buying this thing. I know you’ll love it when you can get some peace as long as the little one is asleep.